Post by wonk on Apr 17, 2013 16:27:30 GMT -5
Installed a set of Gen Right Rocker Guards last week and thought I would do an install/review. Pluses include, very well made, and give great coverage of the whole rocker from frame to the kick plate and from flair to flair. They also tuck up good and tight to the body, boat side style and include quality hardware. These things have 36 bolts PER SIDE. Negatives are they're pricey, I DON'T like the Gen Right emblem cut into the kick plate, and the instructions SUCK.
First off I started by sorting the hardware and figuring out where it all went and how (first suck on the instructions). There are 12 - 5/16" (I think) body clip nuts with 12 grade 8 hex head bolts. These attach the "inner structure" to the pinch seam on the bottom of the rocker. There are 6 per side. You will have to remove the rearward factory bolt that attaches the bottom of the front fender to the pinch seam. Save it for reuse. The body clip nuts slide over the pinch seam with the nut side inboard at the 6 factory holes where the factory Rubicon rocker guards bolt to. I'm not sure if the X model has these holes but the Rubicon and the Saharas do. The two nuts on the forward end have to go between the fender and pinch seam, like so.

There are thirteen 1/4-20 body clip nuts that get installed on the top edge of the inner structure. You then lay the kick plate on top of the inner structure. Do not install any of these bolts yet. Unbolt the three factory tub bolts underneath. The pinch seams have to be trimmed for the outer boat sides to fit so break out the grinder (also not mentioned in the instructions). I trimmed the rear pinch seam as far as I felt comfortable without cutting into the "bubble".

I test fit the boat side and saw they still did not clear. The inner structure actually fits a little higher than the bottom edge of the factory flares.

These needed to be trimmed 5/8" for the boat side to clear.

I used a cutting wheel on my Dremel tool to trim them, then cleaned up the edge with some sandpaper.

The rear flare has a inner "flap that can just be pushed out of the way.

I then marked the boat side itself and notched it, front and rear.


Once everything clears, put all thirteen of the bolts in on the top of the boat side, sandwiching the kick plate between it and the inner structure. Don't tighten yet. Next put the three body bolts back in. Gen Right supplies a new longer body bolt and an aluminum spacer to replace the frontmost body bolt. Now tighten everything down. DO NOT mark or drill the holes for the kick plates until everything is positioned and tightened down or you will have a LOUSY fit!! I used a transfer punch to locate all 13 kick plate holes. I then VERY CAREFULLY drilled a small pilot hole being certain the hole is centered in the kick plate hole. Loosen all the bolts now and take the boat side and kick plate off to drill the holes for the nutserts. Again, Gen Right's instructions didn't even say what size drill to use. I used a 25/64" bit.
I shot a little paint in the raw holes before installing the nutserts. Gen Right supplies a two wrench tool to put the nutserts in but I used my pop rivet style tool to put them in. MUCH easier. Take your time here because it's easy to screw up one of these nutserts then you'll be stuck with drilling out the bad one and finding a replacement. The four nutserts that go into the front fender are the worst. You will need to take a punch and dent the inner panel inward in order to make the hole deep enough for the nutsert to fit. You could drill through this but I don't know what's behind it and how much of a leak problem it might cause. I just kept punching until the nutsert would fully seat.
Once they are all installed, bolt everything back together to check final fit. The instructions say to fit everything before you do any paint or powder coat finish on these. This is definitely the way to go.
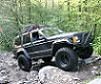
Finshed product is definitely beef and looks pretty good too (I still don't like the logo in the kick plate). There are other pics in my Photobucket album. Any questions just ask away.

First off I started by sorting the hardware and figuring out where it all went and how (first suck on the instructions). There are 12 - 5/16" (I think) body clip nuts with 12 grade 8 hex head bolts. These attach the "inner structure" to the pinch seam on the bottom of the rocker. There are 6 per side. You will have to remove the rearward factory bolt that attaches the bottom of the front fender to the pinch seam. Save it for reuse. The body clip nuts slide over the pinch seam with the nut side inboard at the 6 factory holes where the factory Rubicon rocker guards bolt to. I'm not sure if the X model has these holes but the Rubicon and the Saharas do. The two nuts on the forward end have to go between the fender and pinch seam, like so.

There are thirteen 1/4-20 body clip nuts that get installed on the top edge of the inner structure. You then lay the kick plate on top of the inner structure. Do not install any of these bolts yet. Unbolt the three factory tub bolts underneath. The pinch seams have to be trimmed for the outer boat sides to fit so break out the grinder (also not mentioned in the instructions). I trimmed the rear pinch seam as far as I felt comfortable without cutting into the "bubble".

I test fit the boat side and saw they still did not clear. The inner structure actually fits a little higher than the bottom edge of the factory flares.

These needed to be trimmed 5/8" for the boat side to clear.

I used a cutting wheel on my Dremel tool to trim them, then cleaned up the edge with some sandpaper.

The rear flare has a inner "flap that can just be pushed out of the way.

I then marked the boat side itself and notched it, front and rear.


Once everything clears, put all thirteen of the bolts in on the top of the boat side, sandwiching the kick plate between it and the inner structure. Don't tighten yet. Next put the three body bolts back in. Gen Right supplies a new longer body bolt and an aluminum spacer to replace the frontmost body bolt. Now tighten everything down. DO NOT mark or drill the holes for the kick plates until everything is positioned and tightened down or you will have a LOUSY fit!! I used a transfer punch to locate all 13 kick plate holes. I then VERY CAREFULLY drilled a small pilot hole being certain the hole is centered in the kick plate hole. Loosen all the bolts now and take the boat side and kick plate off to drill the holes for the nutserts. Again, Gen Right's instructions didn't even say what size drill to use. I used a 25/64" bit.
I shot a little paint in the raw holes before installing the nutserts. Gen Right supplies a two wrench tool to put the nutserts in but I used my pop rivet style tool to put them in. MUCH easier. Take your time here because it's easy to screw up one of these nutserts then you'll be stuck with drilling out the bad one and finding a replacement. The four nutserts that go into the front fender are the worst. You will need to take a punch and dent the inner panel inward in order to make the hole deep enough for the nutsert to fit. You could drill through this but I don't know what's behind it and how much of a leak problem it might cause. I just kept punching until the nutsert would fully seat.
Once they are all installed, bolt everything back together to check final fit. The instructions say to fit everything before you do any paint or powder coat finish on these. This is definitely the way to go.
Finshed product is definitely beef and looks pretty good too (I still don't like the logo in the kick plate). There are other pics in my Photobucket album. Any questions just ask away.